systemd: Start your Firewall before network interfaces coming up

linux debian, ubuntu, systemd, networking, uptables

There are a serveral “tutorials” and code snippets out there but they wont work on modern systemd versions and may cause fatal errors! In case you want to start your firewall before the network interfaces will be initialized, you have to hook into the special systemd target network-pre.target. It is a passive target which is invoked before any network services has been started.

Additionally, you have to explicit set the DefaultDependencies=no option – otherwise systemd automatically adds dependency of the type After=basic.target to your service and your firewall is invoked AFTER networking has been started!

Systemd Service File#

The following service file assumes that your firewall script is located in /usr/sbin/myfirewall.sh

[Unit]
Description=MyFirewall

# Start before Network Interfaces coming up
Before=network-pre.target
Wants=network-pre.target
After=local-fs.target

# Do not start after basic.target!
DefaultDependencies=no

[Service]
ExecStart=/usr/sbin/myfirewall start
ExecStop=/usr/sbin/myfirewall stop

# Just Execute the shell script
Type=oneshot
RemainAfterExit=yes

Debugging Service Startup#

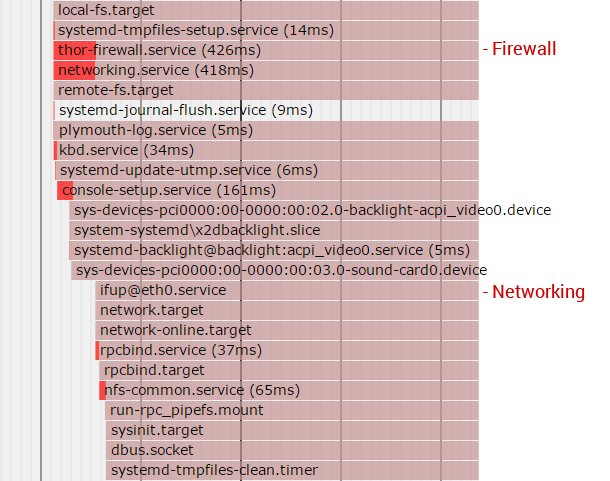
The systemd-analyze utility provides a really cool way to show the system startup. Finally you should verify that your firewall is executed before networking has started!

# dump the service startup
systemd-analyze plot > /root/systemd_startup.svg

Example#

Startup of the Firewall and Networking

As of WordPress 4.6 it is possible to hook into the wp_send_new_user_notifications action to disable the new user notifications send to site admins or the new user.

// The Parameter "$behaviour" can be set to:
// "none" (no notifications are send); 
// "default" (no changes); 
// "admin" (notifications send to admin only); 
// "user" (notification send to user only); 
// "both" (notifications send to admin + user)
public static function limitNewRegistrationNotifications($behaviour){
    // do nothing
    if ($behaviour == 'default'){
        return;
    }

    // handle user registrations (self registered users)
    remove_action('register_new_user', 'wp_send_new_user_notifications');

    // new users added via wp-admin are created using add_user() -> edit_user() chain, NOT register_new_user()
    // @see https://developer.wordpress.org/reference/functions/add_user/
    remove_action('edit_user_created_user', 'wp_send_new_user_notifications', 10, 2);

    // notifications disabled ?
    if ($behaviour == 'none'){
        return;
    }

    // add custom callback and override the $notify setting with custom behaviour
    add_action('register_new_user', function($user_id) use ($behaviour){
        // trigger notification
        wp_new_user_notification($user_id, null, $behaviour);
    });
    add_action('edit_user_created_user', function($user_id) use ($behaviour){
        // trigger notification
        wp_new_user_notification($user_id, null, $behaviour);
    });
}


This Tweak is available as part of the Tweakr WordPress Plugin.

WordPress: Get Raw Document Title without Blog Name

document_title_parts, wp_get_document_title

Sometimes it is necessary to retrieve the current Document Title (used in the title tag) without the blog name or separators. As of WordPress 4.4 the wp_get_document_title() function become available which should be used to fetch the title – unfortunately it doesn’t accept any arguments and it is not possible to access the pure page title directly. Instead we can hook into the document_title_parts filter which allows us to access all title parts (title, page, tagline, site).

Workaround#

// workaround to retrieve the document title
function getDocumentTitle(){
    // temporary title
    $documentTitle = 'Unknown';

    // extractor function
    $extractor = function($parts) use (&$documentTitle){
        if (isset($parts['title'])){
            $documentTitle = $parts['title'];
        }
        return $parts;
    };

    // add filter to retrieve the page title
    add_filter('document_title_parts', $extractor);

    // trigger title generation
    wp_get_document_title();

    // remove filter
    remove_filter('document_title_parts', $extractor);

    // return result
    return $documentTitle;
}


Currently (v380.64_2) there is no out-of-the-box mechanism to setup persistent crontabs which survives a system reboot. But there is a simple workaround availabe.

Your Crontab File#

First of all, create a standard crontab file and store it in your persistent JFFS partition. In this example /jffs/configs/cron

# Syntax
# MM HH DayOfMonth Month DayOfWeek <action>

# Run Backup Script at 4am
0 4 * * * /jffs/scripts/backup.sh

Setup Crontabs on startup#

To load the crontab list on boot, add the following line to your init-start script in /jffs/scripts/init-start

cp /jffs/configs/cron /var/spool/cron/crontabs/admin

That’s it!

Contact Form 7: Add Custom Data Providers to Select Elements/Tags

wordpress, wpcf7, select, values, database, lists, callback, programmatically

Every WordPress Power User knows the awesome Contact Form 7 plugin. It is (one of) the best plugins to create custom forms without any PHP knowledge – especially useful for endusers/customers.

But sometimes you need to create select list values programmatically. Unfortunately the Contact Form 7 Docs are very poor in matter of advanced use cases including the build-in filter hooks.

WPCF7 Form Editor#

Just add a unique name to the data attribute – in this example my.data.provider. This allows you to match the element within the filter hook!

<p>
<label> My List
    [select mylist include_blank data:my.data.provider]
</label>
</p>

Filter Hook#

Roll the drums…the magical filter hook wpcf7_form_tag_data_option allows you to alter the options list and add options/values to the select list within a simple callback

add_filter('wpcf7_form_tag_data_option', function($n, $options, $args){
    // special data provider tag found ?
    if (in_array('my.data.provider', $options)){
        return get_my_value_list();
    }

    // default - do not apply any changes within the options
    return null;
}, 10, 3);

Well, thats it!

HowTo: Wakeup your Synology NAS from Standby/Power Save Mode

timeout, linux, ubuntu, backup, scp, sftp, System Hibernation, backup

Scheduled Backups from Remote Locations#

As poweruser, you may have different servers out there which send their backups to a centralized backup location – in this example, a Synology NAS. The file transfers can be done by ftp, sftp, scp, nfs or another supported protocol.

In case you want to safe energy costs, it possible to enable the power safe mode which turns the system (as well as the HDDs) in standby mode. It can be waked-up by accessing the web-interface or some other file services, but this will take around 30-60s! In most cases, this behaviour will cause a timeout or connection refused error in your backup scripts. To prevent this, you can wake up your NAS before running the backup tasks. The following script tries to access the Web-Interface (DSM) on port 80 for a several times and returns 0 as exit code in case a valid response is returned by the remote server.

Wake-Up Script#

#!/bin/bash

# Synology NAS Wake-up
# ------------------------------------

# hostname/ip set ?
if [ -z "$1" ]; then
    echo "Usage: synology_wakeup.sh <hostname>"
    exit 1
fi

# get the server response. 5 connection tries with 10s delay -> 200s wait
serverResponse=$(wget --quiet --max-redirect=0 --retry-connrefused --timeout=20 --wait=10 --tries 5 --server-response -O /dev/null $1 2>&1)

# http detection pattern (response will be empty on con_refused)
detectionPattern="HTTP/1.1 (200|30[0-8])"

# server online ?
if [[ $serverResponse =~ $detectionPattern ]] ; then
    exit 0
else
    exit 1
fi

Usage#

Just run the script by passing the ip addess/hostname to it. On error (non responding nas) the script will return the exit code 1.

#!/bin/bash

# your backup/pre backup script

# wakeup your NAS by its IP/Hostname
./synology_wakeup.sh 192.168.0.100

# successfull ?
if [ $? -ne 0 ]; then
   echo "ERROR - Synology NAS seems to be offline!"
   exit 1
fi


Render Markdown/GFM Documents online using the GitHub v3 API

simple code snipped to convert markdown to html, public github api

Sometimes, you need to render parts of your Markdown documents – e.g. README.md or CHANGES.md – as html to embed it into your application, documentation or project website. There are a several markdown or especially GFM (GitHub Flavored Markdown) libraries are out there, but they require an additional setup and have to be maintained.

The simple Way#

Thanks to GitHub, there is a public API available which allows you to render your documents by the GitHub webservices.

PHP Client#

/**
 * Render Markdown content using the GitHub v3 Markdown API
 * @see https://developer.github.com/v3/markdown/
 * @source https://andidittrich.com/2016/05/render-markdown-gfm-documents-online-using-the-github-v3-api
 * @license: MIT
 * @return string(html)
 */
function renderGFM($text, $repositoryContext = null){

    // create the payload
    // @see https://developer.github.com/v3/markdown/
    $postdata = json_encode(
        array(
            'text' => $text,
            'mode' => ($repositoryContext != null ? 'gfm' : 'markdown'),
            'context' => $repositoryContext
        )
    );

    // prepare the HTTP 1.1 POST Request
    $opts = array('http' =>
        array(
            'method'  => 'POST',
            'protocol_version' => '1.1',
            'user_agent' => $repositoryContext,
            'header'  => array(
                'Content-type: application/x-www-form-urlencoded;charset=UTF-8',
                'Connection: close',
                'Accept: application/vnd.github.v3+json'
            ),
            'content' => $postdata
        )
    );

    // send request
    return file_get_contents('https://api.github.com/markdown', false, stream_context_create($opts));
}

Usage#

The optional $repositoryContext argument allows your to define the context which should be used for rendering to e.g. enable issue linking

// fetch the document (example)
$document = file_get_contents('https://raw.githubusercontent.com/AndiDittrich/WordPress.Enlighter/master/CHANGES.md');

// render html using the GitHub GFM API
$html = renderGFM($document, 'AndiDittrich/WordPress.Enlighter');

// show it!
echo $html;


You may have noticed, that normal users (especially Author’s and Contributor’s) are not allowed to use all kind of HTML Tags and related Attributes.

Those elements got removed by the WordPress buil-in KSES Filter – and it’s a very useful feature in matter of security to prevent html-code-injection.

But sometimes it is required to enable some additional html tags and/or attributes. You can modify the list of allowed html tags and attributes by appling a custom filter:

The Filter#

Example how to allow EnlighterJS related attributes for pre and code tags

function ksesAllowHtmlCodeAttributes($data, $context){
    // only apply filter on post-context
    if ($context === 'post'){

        // list of all available enlighterjs attributes
        $allowedAttributes = array(
            'data-enlighter-language' => true,
            'data-enlighter-theme' => true,
            'data-enlighter-group' => true,
            'data-enlighter-title' => true,
            'data-enlighter-linenumbers' => true,
            'data-enlighter-highlight' => true,
            'data-enlighter-lineoffset' => true
        );

        // apply to pre and code tags
        $data['pre'] = array_merge($data['pre'], $allowedAttributes);
        $data['code'] = array_merge($data['code'], $allowedAttributes);
    }

    return $data;
}

// add the filter function (2 arguments and priority 100)
add_filter('wp_kses_allowed_html', 'ksesAllowHtmlCodeAttributes', 100, 2);


Sometimes it can be very useful to have magical constants like __FILENAME__ or __LINE__ available within your sourcecode – especially for debugging or in merged files. Unfortunately, such feature is missing in javascript but it is possible to implement it by yourself using a file-postprocessing filter in your gulp build script. Thanks to gulp-concat-util, it’s […]

Prevent Errors from breaking Gulp watch

gulp-plumber, custom error handler, gulp-prettyerror

As an intermediate javascript developer, you may using gulp these days – a great and straightforward streaming build system with a lot of advantages compared to grunt. For example, i’ve switched from a bunch of custom, ANT based scripts to gulp for the next EnlighterJS major version and it saves a lot of time! Especially […]