Howto: (re-)Enable SCP/SSH Login on Synology DSM 6.0 for non admin users [UPDATE]
a update which may break your backup tasks! change the user shell permanently
When updating to the latest DSM 6.0 final, you may have noticed that your scp backup accounts won’t work anymore (this also affects ssh the login). It is caused by a reset of the login shell settings in /etc/passwd !
It is happened in part of a “security enhancement” – normal users, which does not belong to the administrators group, are not allowed to login via ssh anymore. This might be a good suggestion for the normal user but it will break many advanced use cases.
To re-enable the ssh access, you have to manual edit the /etc/passwd and change the default login shell of the desired user (the chsh command is missing on DSM!). This operation has to be executed as root user via sudo:
HowTo – Enable SSH/SCP Access Temporary#
For Beginners: Simple vi Tutorial
- Step 1: Login as administrative user (group member of administrators)
- Step 2: Edit /etc/passwd via sudo
admin@synology:/etc/ssh$ sudo vi /etc/passwd - Step 3: Search the desired username and replace /sbin/nologin at the end of the line with /bin/sh
- Step 4: Save Changes – That’s it!
Reboot Issue#
This modification will work fine until you reboot your DiskStation: on reboot, the /etc/passwd file will be recreated by DSM and your changes will be lost. Therefore it is required to apply the changes automatically on reboot.
To do this, you can create a simple, awk based script which will replace the login shell entry within /etc/passwd – normally, such modification is not recommended!! In case the script destroys the file, you will not to be able to login via ssh/telnet again. But the DSM Webinterface should be accessible and its normally possible to disable the script.
But keep in mind, you do this on your own risk! On other systems it is strongly recommended to use the chsh command to modify the default user shell, but this command is currently not available in DSM.
Step 1 – Create the Script#
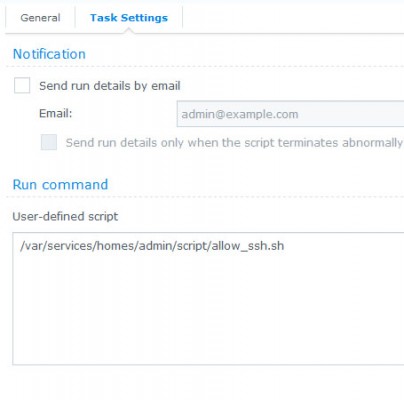
Create a file named e.g. allow_ssh.sh in your admin users home directory (this requires enabled user home service – alternatively place this file into a directory if your choice). I have placed it in the sub-directory script/ of my admin users home directory – the absolute path to the file is /var/services/homes/admin/script/allow_ssh.sh in this example.
The Script
#!/bin/bash

# Change the Login Shell for User "serverbackup" to /bin/sh
/usr/bin/awk -i inplace -F: 'BEGIN{OFS=":"}/^serverbackup\:/{gsub(/.*/,"/bin/sh",$7)}1' /etc/passwd
The script is using awk(gawk) to find the settings row of the user serverbackup and replaces the entry of the 7th column (login shell). To enable shell access for other username, just replace the name – but don’t touch anything before/after!
Save the script and make the file owner+group executable

Step 2 – Autostart#
On every system reboot, the DSM software will re-create passwd file, therefore we need an autostart script. Thanks to DSM, we can create it via the Task Scheduler in the Control Panel.
Create a new Triggered Task
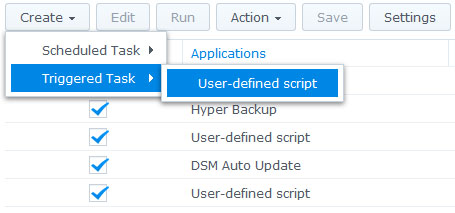
Trigger on boot-up event
The Task has to be run as root

Insert your absolute script path
Thats it!#
On every reboot the script will be executed and modifies the login shell of the given user.
Security Recommendation#
You should only enable ssh access for trusted users, e.g. backup account. And it is strongly recommended to use SSH Key-Based Authentication
Config Change Issue [Update2]#
The DSM seems to regenerate the internal files, including the /etc/passwd file on each modification of the configuration using the Web-Interface – that is very annoying because it may break your backup tasks randomly. As workaround you can set up a cronjob which will be executed just before your backup job is running. This will fix it for most use cases.